This guide provides detailed instructions for installing and configuring your DMA card to ensure a seamless setup and enhanced performance. Follow these steps closely.
Step 1: Preparing Your Main Computer (Gaming PC)
- Check for Custom Firmware:
- Confirm that your DMA card is equipped with custom firmware. Using a DMA card without it may result in a ban in games protected by anti-cheat systems.
- Install the DMA Card:
- Power down your computer and unplug all cables.
- Open your computer case and insert the DMA card into an available PCI-e slot (x1, x4, x8, or x16).
- Connect to the Radar PC:
- Use the provided USB cable to connect the DMA card’s data port to your Radar PC (the secondary computer). Utilize any necessary USB adapters.
- Modify BIOS Settings:
- Restart your computer and access the BIOS settings (usually by pressing F2, F10, DEL, or ESC during boot).
- Disable virtualization settings:
- For Intel: Look for Virtualization/IOMMU and VT-d.
- For AMD: Look for Virtualization/IOMMU and SVM.
- Turn off NX-Bit if available.
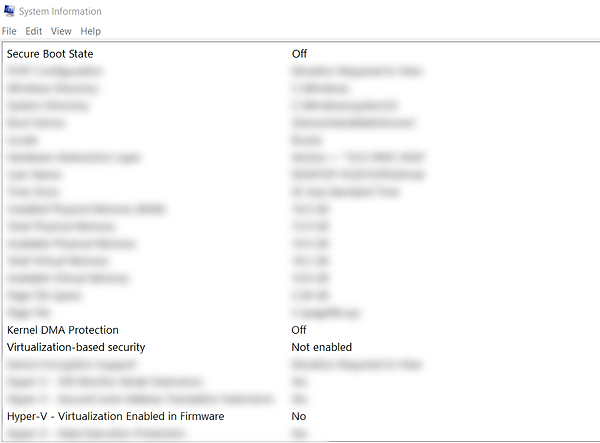
- Disable Kernel DMA protection and Secure Boot.
- Adjust the PCI slot settings for the DMA card from Auto to Gen1 if necessary (Advanced > PCI Settings).
- Ensure Memory Integrity/Core Isolation is disabled in Windows Security. To verify these settings, press
Win + R, typemsinfo32, and hit Enter.
Note: Steps may vary depending on your motherboard. Refer to the motherboard manual or search online for specific instructions if needed.
Step 2: Setting Up the Radar PC
- Install the Driver:
- Download the Windows x64 driver from the DMA Toolbox.
- Unzip the downloaded file.
- Navigate to the file
SETUP.exelocated intoolbox/dma card/75T/CH341SER driver/CH341PAR. - Open the file and click INSTALL. You should see a message indicating Driver Install Success!
Step 3: Testing DMA Card Performance
- Download and Run the Test Tool:
- Obtain and unzip the
lone-dma-test.rarpackage from Discord. - Follow the instructions in the README.txt file.
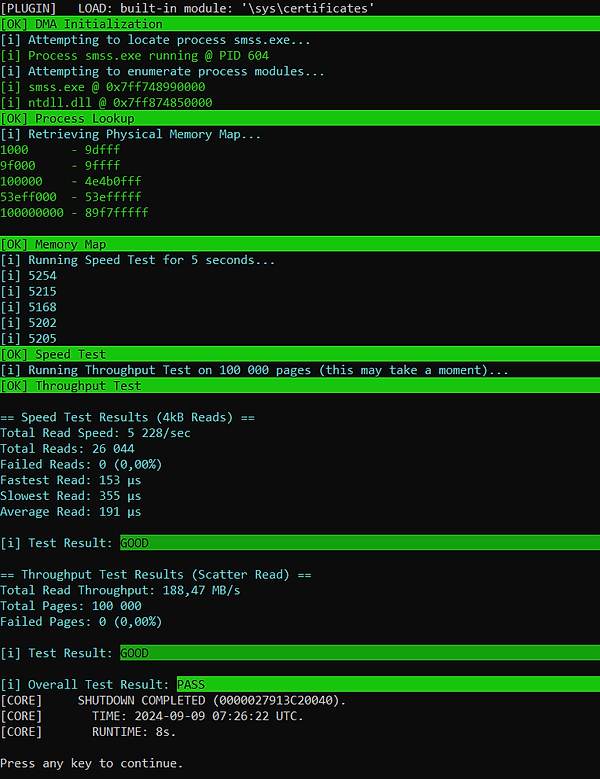
- Execute the test tool on your Radar PC and run a full test. A successful test will display a message indicating that the test PASSED.
- Evaluate Test Results:
- Speed Test Results:
- < 4000: Fail
- 4000+: Acceptable
- 5000+: Good
- 6000+: Excellent
- Throughput Test Results:
- < 125: Fail
- 125+: Acceptable
- 150+: Good
- 200+: Excellent
Troubleshooting Common Issues
- VMM INIT FAILED Error:
- This may occur if the DMA card or connection is unresponsive. Perform a cold boot by shutting down your Game PC, waiting 5 seconds, and then powering it back on.
- Unable to Connect to USB/FT601 Device Error:
- Ensure the FTDI driver is installed on your Radar PC and that the DMA card is properly connected.
- Failed to Retrieve Physical Memory Map:
- Check your USB connection. If the problem persists, consider reinstalling Windows on your Game PC.
- Symbol File Not Found:
- Ensure PCILeech can access symbols from the Microsoft Symbol Server. Check for the presence of
symsrv.dllanddbghelp.dllin the folder and verify internet connectivity and firewall settings. - CORE Initialization Failed:
- Revisit your BIOS settings and troubleshoot the USB connection. Reinstallation of Windows may be necessary.
- DMA Test Tool Failures:
- Inspect USB connections and ensure cables are securely connected. Switch your Radar PC to High Performance power plan and utilize data-rated USB 3.0 cables.
- Software Loading Issues:
- This may be due to insufficient memory. Consider adding more RAM and avoid disabling the system page file unless absolutely necessary.
By following these instructions, you should successfully install and configure your DMA card.
Ready to Explore DMA Cheats?
Join our exclusive Discord community by clicking here to start cheating in your favorite video games!
- Support: Get personalized help and tips directly from me.
- Community: Connect with fellow DMA gamers and find teammates.
- Updates: Be the first to learn about new features and updates.
Leave a Reply